

It is that time of year again: The trees have no leaves, the grass is yellow, but the neighborhood is aglow with color. It must be December! Time to photograph the lights and ornaments that adorn the region.
Before you head out to photograph those lights, here are a few tips to take with you.
It has never been easier to photograph the holiday lights. Modern cameras have a great dynamic range and the ability to shoot in low light without much noise. That means photographers can be creative with their holiday light photography in a way that was not often practiced in the past.
However, before exploring the creative side of holiday light photography, let’s look at taking a good sharp image of the decorations. That begins with equipment.
- Tripod
- Wide Angle Lens
- Macro Lens
- Zoom Lens
- Camera Release
- Hot Chocolate
Night photography is low-light photography. Sure, you can walk around snapping images at the max ISO of your camera, but to limit image blur from camera shake and to bring out your creative side, a tripod is your friend. A lot of holiday displays will have flashing lights and moving ornaments that will also affect how you take your picture. You will need to strike a compromise between having the light to create a good image and the ability to stop some action. Don’t leave your camera on Auto or Program. You will want to set your exposure manually for the best images.
Recommended camera settings
ISO: To stop action, you will need a sensitive ISO of around 800 to 1200 ISO, but that can vary depending on your camera. Some cameras can shoot at 1600 or higher without much noise, while others cannot. The best way to determine your camera’s noise level in low light is to take a few pictures of the same setting while adjusting your ISO. Then you can judge for yourself what noise you are happy with in your images.
Shutter: The best thing about a digital camera is that you can see what is happening. 1/60 of a second will generally stop slow action. 1/125 will be better, but depending on your selected ISO, it may be too dark. Try starting around 1/60 of a second and adjust accordingly. If you are using a tripod, try slower shutter speeds as well, but most people not using a tripod will have issues with the lights blurring from camera movement if shooting slower than 1/60.
Aperture: You will often be photographing a larger area from a relative distance. This means you are not as concerned about depth of field. Start by opening your aperture to the max to allow the greatest amount of light to flow into your camera, f/2.8 to f/5.6 based on the lens you are using.
Basic Holiday Light Photography
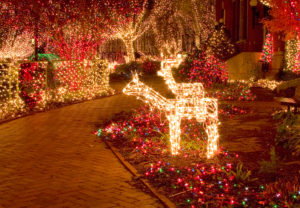
Holiday Lights. ISO 1000 – f/4 – 1/60
Again, to help prevent motion blur from shaking the camera, this picture was taken on a tripod. Small lights against a dark backdrop will certainly show camera movement as blurry points of light.
Having Fun with Holiday Lights
Now that you have the basics out of the way, here are a few creative things you can do while photographing the holiday lights.
Zoom
 Want your friends to say, “Wow, how did you do that?” Then this a fun, tried-and-true effect. It could not be more simple. It doesn’t even require a tripod, as motion is the whole point. A tripod will help, however, if you desire straight instead of wavy lines.
Use a zoom lens on your camera. A 70 to 200 f/2.8 is perfect. Open your camera aperture wide, set your camera to ISO priority, and then set your shutter speed to something slow… a second or slower. For best results, find some lights that are in a cluster that you can center in the frame. Start with the lens zoomed out. Release the shutter and slowly zoom in while the shutter is open. That’s it. Super cool images that will wow any Doctor Who fan.
Zoom Soldier: ISO 100 – f/8 – 2 seconds
Macro
Macro is not just for flowers. A good macro lens is great for photographing a lot of holiday faire. From decorations to cookies, there are a lot of beautiful things to photograph up close during the season.
A macro lens helps you to focus on one item, reducing the seasonal clutter.
Bokeh
Bokeh is that cool effect shown when lights are soft, out-of-focus orbs. This may be the subject of your image, or the background for subjects such as macro images or portraits. Bokeh is simply the fall-off outside the depth of field. The best way to achieve this is with a lens with a wide aperture at least f/4, though lenses with wider apertures such as f/2.8, f/1.8 or f/1.4 are ideal. Just remember, when photographing with the aperture wide open, your depth of field will be very shallow. Ensure your items you want in focus are lined up side by side and not deep, or something will be out of focus.
Try taking pictures in Aperture Priority mode, often AV or simply A (if A is not being used for Auto) on most cameras. This will allow you to set your ISO (try around 800) and the aperture, then the camera will select the appropriate shutter speed. Be sure to use your tripod, as the shutter speed selected by the camera may be slow, in the 1/15 region if there is not a lot of light.
Make People Disappear
If you take pictures of the lights in any park or town square, then you have dealt with this issue: People everywhere. What do you do? Well you can wait until 3 a.m. and try to get there when nobody is around. Or perhaps you can just use a very long exposure. This tip won’t work if the people you want to disappear are sitting on a bench or just standing around, but if it is casual walkers that are the issue, then this just might do the trick.
A tripod is required for this tip, as exposures will be made over 30 seconds — perhaps even longer. The goal is to take a well-exposed image over such a long period of time that the casual walker will not be in the same location long enough to register in the picture. How slow the exposure depends on how slow the walkers. To facilitate the long exposure time, you will need a low ISO around ISO 100, and you will need to close down the aperture to around f/22, then try an exposure of around 30 seconds. Adjust accordingly as needed.
Advantages: No people blocking the lights, plus a great depth of field thanks to the small aperture.
Disadvantages: This works on small groups that continue to walk, large crowds might still not be caught as people but they will blur the area. You must do this on a calm night. Any wind will blur the lights and foliage over such a long period, as will any moving displays.
Walkers are gone. ISO 100 – f/22 – 30 seconds
Photographer
John Baltz
 John is a seasoned professional with nearly 30 years in photography. A native to Northwest Arkansas, John’s first interest in photography began with collecting cameras as a child from antique markets around town. Later, John received a degree in Computer Science from the University of Arkansas. It is his strong knowledge in digital photography, along with a love for the the history of photography that provides for a unique sense of creativity driving many of his projects.